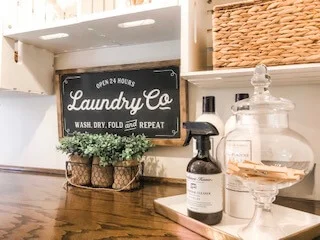
Farmhouse Laundry Room Makeover
Even if you’ve found the perfect system for doing laundry, there’s no getting around the fact that we all spend a lot of time in the laundry room.
This room deserves some love!
My favorite aspect of home decorating is connecting with what my client envisions and bringing it to life. For this project, my client was looking to refresh her darling but outdated laundry room.
In this post I’ll show you 10 steps we took for getting this look!
Check out the Before:
Laundry Room “Before”
1. Get Inspired
Our first stop was Pinterest to get a feel for the styles and colors that she loved the most. Together we created a board with her favorite laundry rooms. There were designs from all ends of the spectrum - classic, vintage, modern, and some amazing looks that could only described as “Wow!”. The ones she loved the most had a rustic, country farmhouse look. This one was her favorite!
Her Pinterest Inspiration
2. Pick Your Colors
We noticed a common thread throughout her favorite pins and decided on a simple color palette of traditional farmhouse colors:
· Clean white
· Black
· Green
3. Create a Wish List
When you are creating your wish list, the sky is the limit. You are not limiting yourself by your budget, timing or resources. Imagine all possibilities are open to you and write down everything you want.
Here is my client’s wish list of everything else she wanted in the room:
- Fresh paint
- New lighting
- New floors
- New copper sink and countertop
- A finished wooden countertop to go over the washer and dryer.
4. Establish the Purpose of the Room
While this seems obvs, (it is a laundry room!), we really wanted to define what she needed it for and what would be stored there. This room tends to be a catch-all for many households, so deciding what would be in there and what wouldn’t, was helpful in creating “zones” for the different categories of items:
Countertop workspace for folding clothes
Brooms and mops storage
Cleaning supplies and caddy
Laundry supplies
Pet supplies and pet towels
Personal care items
Medicine
Blankets
Sewing supplies
Area for cat food and water
4. Establish a Budget
This step is super important. Every decision in the project is based on your budget! Your budget determines if you will be using what you already have, shopping at the Dollar Store, Pottery Barn, custom options, etc. Having a budget keeps it real and ensures your spending stays on track.
5. Establish a Timeline
Timing is everything. Is my client preparing for a family visit and needs the space completed by the weekend? Do they have limited hours per week to devote to a project and prefer to space it out over months? Keeping all of their considerations in mind, I create a timeline for completing the project by listing out all of the related tasks to the project and due dates for each.
6. Measure It Up
After figuring out the color palette, wish list, and timeline, it was time to get started on the room itself. I measured the room for decor and organizing products and estimated how many and what type of bins we would need.
7. Shopping!
The focal point of the room is the crate shelves so I started with those. I searched FB marketplace and found a local couple that painted and sold crates to make money for their grandchildren. They were able to do a custom order of six for us. (I heart supporting small business!)
More shopping! With my client’s budget in mind, I went shopping at different stores, gathered inspiration, and priced out the products.
I found a lot of cute things but was not able to find the Laundry sign so I checked out Etsy and found this awesome sign from Huckleberry Avenue (@huckleberry.ave).
Sign perfection from the Huckleberry Avenue shop on Etsy!
Next stop, The Container Store for my favorite go-to products that would work best in her space!
The Container Store aka, Disneyland for Organizers!
8. Remodel the Room
My client’s husband, who is in construction, was able to do everything on her wish list and more! He removed the wallpaper, painted in a clean white, removed the cabinets, installed gorgeous tile floors, installed the crate shelving, poured a custom concrete countertop, and moved the sink next to the washer/dryer. Stunning!
New floors, shelves, sink, lighting and countertops are in!
9. Installation Day - Part 1; Purge, Sort, Organize, and Containerize
Installation Day was finally here! The amazing Melissa of Melissa Keyser Organizing, came over to help with the install, labeling, and decorating. After the cabinets had been purged for donation items, we sorted everything by category, containerized, and labeled.
Melissa working on the Cricut labels. Jimmy wants to help!
Here are the Laundry Room linen cabinets Before:
Laundry room linen cabinets “Before”.
And After!
10. Installation Day - Part 2; Decorate
After the containers were labeled and installed, it was time to decorate!
It was so much fun working with this amazing couple on this transformation. I was overjoyed to work on this project for my client to organize and decorate her laundry room after her husband’s amazing renovation. :)


